 |
|
  |
|
 |
|
 |
Stil working on it
Hi Bicycle fans in the English speaking parts of our small world. Specially for you I did try to translate the German Manual of the military "Ordonnanzfahrrad" user in the Swiss Army. I did get a copy as PDF file and had to make first TXT files from that one, page by page. Than I did scan them back as readable PDF files and did some translation with Microsoft Word. So it will not be perfect but who is? Ofcourse it did not work this way. Any suggestion to make it better is welcome. Hope you like it. Please help me to translate this. Ben van Helden 2006
|
 |
|
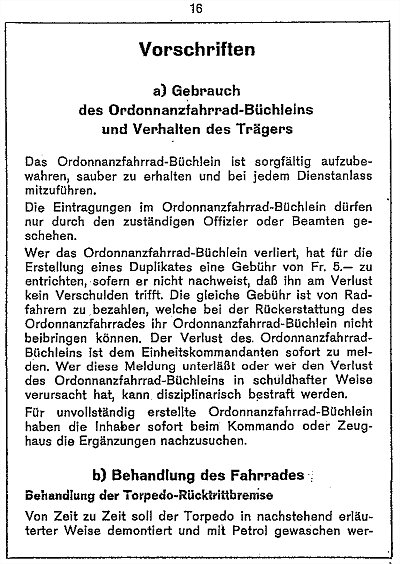 |
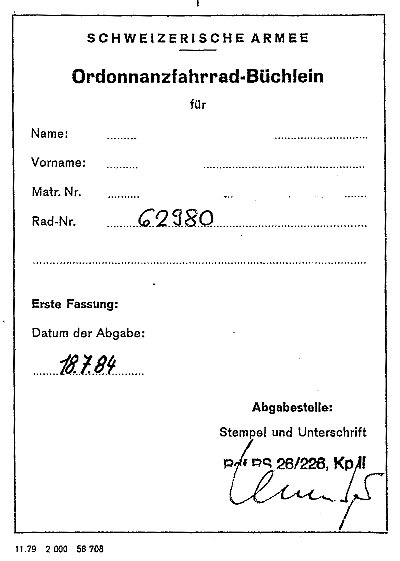
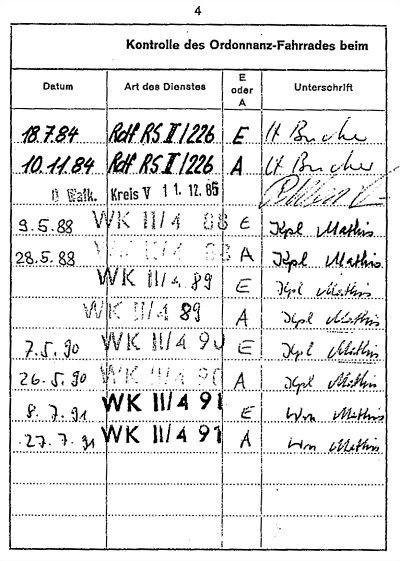
Regulations
a)
Use
The
Ordonnanzfahrrad booklet is to be kept carefully kept clean and
carry with each service cause.
Those same fee is to be
paid from cyclists to, who during the restitution of the
Ordonnanzfahrrad their Ordonnanzfahrrad booklet not to teach
know. The loss of the Ordonnanzfahrrad booklet is the commander
of unit immediately to announce. Who this message omits or who
the loss of the Ordonnanzfahrrad booklet in culpable Way caused,
can be disciplinarily punished. For incomplete provided
Ordonnanzfahrrad booklets have the owners immediately with the
command or To seek arsenal the additions restitution of the
Ordonnanzfahrrad their Ordonnanzfahrrad booklet not to teach
know. The loss of the Ordonnanzfahrrad booklet is the commander
of unit immediately to announce. Who this message omits or who
the loss of the Ordonnanzfahrrad booklet in culpable Way caused,
can be disciplinarily punished. For incomplete provided
Ordonnanzfahrrad booklets have the owners immediately with the
command or t seek arsenal the additions.
|
 |
After the cleaning with Petrol all parts must well dried. The
parts must lightly greased with Vaseline, with exception of the
roll drives with the thread head. If the roll drives come into
contact with the fat, then the rollers at the hub body do not
seize no more on and the drive cannot take place.
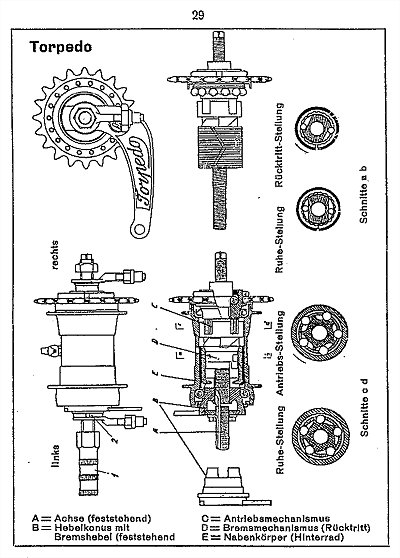
After removal of the wheel from the rear wheel fork removing the
locknut holding of the lever-konus at the brake lever with the
left hand. Begin the torpedo key at the square of the axle and
tricks of the same from right to the left. Drive out the entire
mechanism (drawing page 29)
|
 |
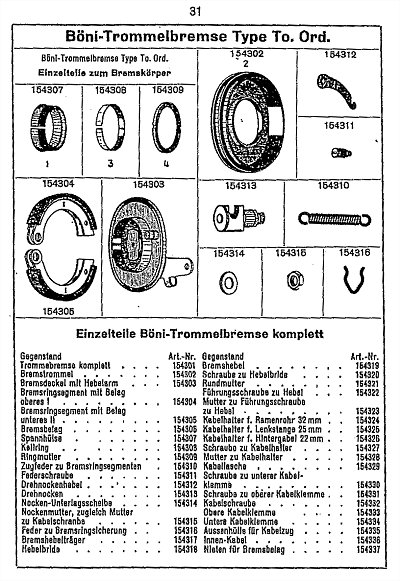
Treatment of the <<Böni>> drum brake. The brake lining is to protect for oil and fat and is not to be touched with greasy fingers. to catch flowing oils from the Torpedó hub, is inside the brake cover a oil catch ring attached, which prevents that oil reached the brake shoes. By in Brake cover within oils fang struggle existing hole is possible penetrated oil outward led become. It is to be made certain therefore that this hole is not clogged.That oil catch ring fulfilled however only his purpose, if the torpedo hub reasonably lubricated, D. h. not with oil one inundates. The drum brake is up no case to oil or too greasy oiled brake linings brake-badly and àll1 best are replaced by new. Temporarily ever nevertheless that can Drain on hot oren remedy create, open fire may however not to be used. The brake whistles then is this an indication that it oiled.
Disassembly and assembly of the
"Böni" drum brake
After the annular nut, strikes one is distant for that easily with that Mallet on the edge of drum to the drum jumps off. Installing, whereby correct sticking of the drum on the torpedo hub to reach is seems, in the following way: |
 |
Press the adapter sleeve (1) with the
screwed-in thread over the left torpedo hub end. Then slide the
drum (2) over it and make sure that it rests well on the back. Place the wedge ring (3) with the thin part in between the drum and the clamping sleeve so that the slots of the wedge ring and the clamping sleeve are offset from one another. The wedge ring is to be pressed in until the thread for the ring nut is released, but to push in the wedge ring no breakthrough etc. to use. Now screw on the ring nut (4) and tighten with socket wrench. Now you control how the drum is running, i. whether it does not wobble sideways. If this is the case, it should be aligned with the mallet. Using the hammer and brass attachment, lightly beat around on the flat side of the ring nut so that the wedge ring is firmly pressed in. Then the ring nut again by means of plug connections! Attract. This process is repeated several times until the drum is firmly seated. Disassembly and assembly of the handlebar and steering Handlebar: 1.Loosen the nut on the brake linkage with a key. 2.Loosen the clamping screw (several passages) with a key. 3.Loosen the clamping cone by pressing down the clamping screw. 4.Pull out the handlebar. |
 |
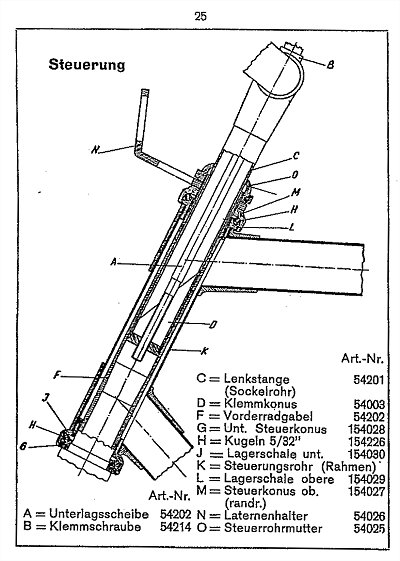
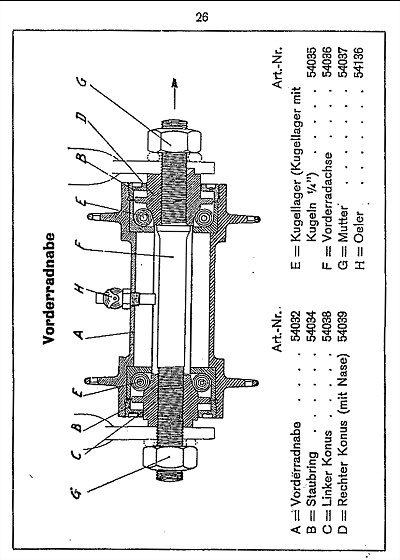
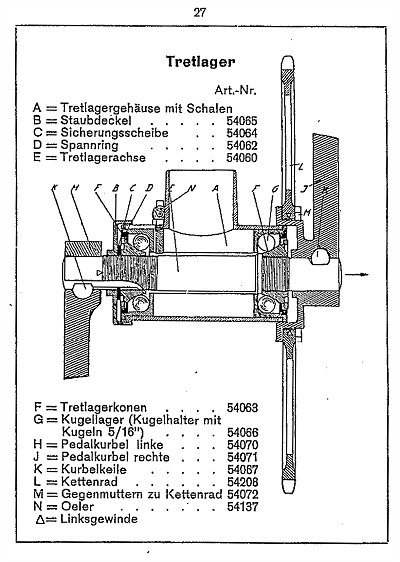
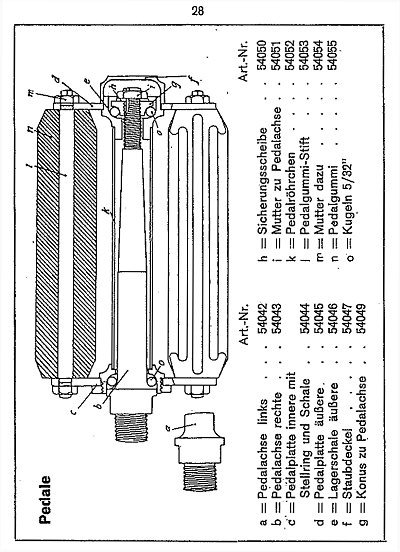
Control: 1. Remove the head tube nut with key. 2. Remove the lantern holder. 3. Remove the upper control cone 4. Remove the upper ball set. 5. Lift the frame by approx. 9 cm. 6. Remove the lower ball set. 7. Extending the fork. The assembly takes place in reverse order. Disassembly and assembly of the front hub 1. Loosen the nuts G with a key. 2. Remove the dust rings B with a key. 3. Remove left cone C with key. 4. Extending the axle In à direction. The assembly takes place in reverse order. Disassembly and assembly of the bottom bracket. 1. Loosen the left crank key. 2. Remove the crank. 3. Release the left dust cover with key (left-hand thread). 4. Remove the lock washer. 5. Remove the left cone with key (left-hand thread). 6. Extend the axis in ---> direction. The assembly takes place in reverse order. Disassembly and assembly of the pedals 1. Remove the dust cover. 2. Remove the axle nut. 8. Remove the lock washer. 4. Remove the cone. |
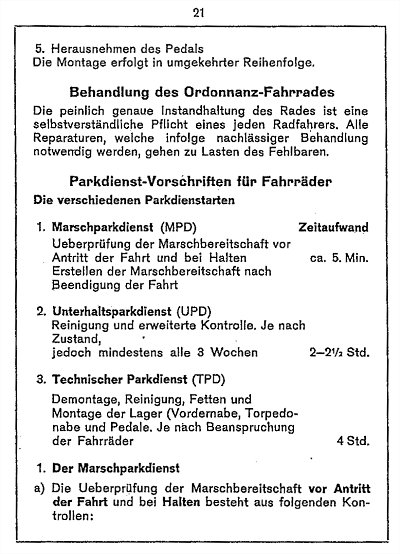 |
5. Remove the pedal. The assembly takes place in reverse order. Treatment of the orderly bicycle The meticulous maintenance of the bike is a natural duty of every cyclist. All repairs that become necessary as a result of careless handling are at the expense of the defective. Parking service - Regulations for bicycles. The different parking service ticket 1st march park service (MPD) Check the readiness to march before starting the ride and keep holding Create the readiness to march after finishing the drive. Approximately 5 minutes. 2. Maintenance Service (UPD) Cleaning and advanced control. Depending on the condition, however, at least every 3 weeks. 2 - 2 ½ hours 3. Technical Parking Service (TPD) Dismantling .. Cleaning, greasing and mounting of the bearings (front hub, torpedo hub and pedals, 4 hours depending on the load on the bike. 1. The march park service a) The verification of the march readiness before the start of the journey and at the holding consists of the following controls: |
 |
to pay for the whole repair
itself, but it can still be instituted against him for the
military court proceedings because of letting go and the
squandering of war material. For repairs that occur outside of service, only substitutes may be used as substitutes. Non-order components will be replaced upon entry into any service at the expense of the man. Are ordonnanzteile not available from the local bicycle manufacturer, so should not be purchased Fast-Ordonnanzbestandteile but, then these are to be obtained from an Eidg. Arsenal, against payment of the replacement price. Each order must be accompanied by the Ordonnanzfahrrad booklet. In order to avoid unnecessary scribing, the desired piece should be exactly identified using the name and number given in the technical part. Where this concerns right or left, inner or outer parts, this should also be specified. Storage of the orderly bicycle when not in use. Easy inflation of the hoses. Lightly oil the whole wheel except the leather parts. The bike must be stored in a dry, protected from sunlight room, either on a bicycle stand or suspended suspended. In any case, the wheel should not be left unused for a long time on the pneumatic, otherwise the rubber will be brittle. The wheel should be subjected to a periodic inspection when not in use, whereby the tires are checked and, if necessary, all the parts already mentioned are oiled or greased. |
 |
|
 |
|
 |
|
 |
|
 |
|
 |
|
 |
|